

Using Wireshark for WiFi Analysis
Using Wireshark for WiFi Analysis
Wireshark remains the go‑to packet analyzer for network professionals. When it comes to wireless, the tool can decode every 802.11 frame, expose hidden management fields, and even reveal encrypted traffic if you supply the right keys. This guide walks through the entire workflow: putting a compatible adapter into monitor mode, applying precise display filters, decrypting WPA2 traffic with a known pre‑shared key, and extracting useful data from management frames. The focus is on practical steps that you can repeat on a laptop or on a dedicated device such as the BLEShark Nano.

Terminal showing packet capture session (Wikimedia Commons)
Hardware preparation
The BLEShark Nano is built around an ESP32‑C3 RISC‑V MCU (single‑core, 160 MHz) with integrated BLE 5.0 and 2.4 GHz WiFi. Its small form factor, USB‑C charging, and 500 mAh battery make it ideal for field work. Unlike cheaper hobby boards, the BLEShark Nano offers a full‑featured WiFi radio that can be switched to monitor mode, capture handshakes, and export PCAP files directly to a host PC.
When you need to monitor a larger area, the Shiver mesh can extend coverage. Up to 16 nodes can be linked via ESP‑NOW at 250 kbps long‑range mode, giving a practical range of 20‑50 m per hop. Deploying a few Shiver nodes around a campus or a warehouse creates a distributed sniffing platform that feeds all captured frames back to a central Wireshark instance.
Capturing 802.11 frames in monitor mode
Monitor mode is the key to seeing every over‑the‑air packet, not just those addressed to your own NIC. On the BLEShark Nano the process is straightforward:
- Connect the device via USB‑C and open a terminal.
- Run
bleshark --wifi monitor onto enable monitor mode on the internal WiFi radio. - Optionally set a channel with
bleshark --wifi channel 6(replace 6 with the target channel). - Start the capture:
bleshark --wifi capture -o capture.pcap.
If you are using a laptop, the same steps apply with airmon-ng start wlan0 (Linux) or the appropriate macOS command. Once the interface is in monitor mode, launch Wireshark and select the newly created interface (e.g., wlan0mon or bleshark0). Wireshark will immediately begin displaying raw 802.11 frames.
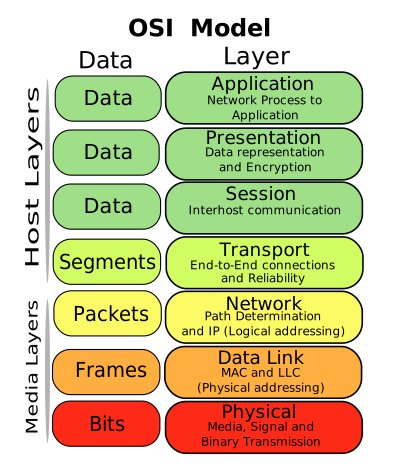
OSI Model layers – Wireshark can decode all seven layers (Wikimedia Commons)
Display filters for WiFi
Wireshark’s display filter language lets you isolate exactly the traffic you need. Two filters are essential for WiFi work:
-
wlan.fc.type_subtype == 0x20– shows only data frames. Replace0x20with the hex value for other subtypes (e.g.,0x04for probe requests). -
eapol– displays only EAPOL frames, which carry the four‑way handshake used in WPA2 authentication.
Combine filters with logical operators for more precise views. For example, to see only EAPOL frames that belong to a specific BSSID, use:
eapol && wlan.bssid == aa:bb:cc:dd:ee:ff
These filters reduce visual clutter and let you focus on the handshake exchange, management traffic, or any other subset relevant to your analysis.
Decrypting WPA2 traffic with a known PSK
Wireshark can decrypt WPA2‑PSK traffic if it has two pieces of information:
- The pre‑shared key (PSK) in plain text.
- The complete four‑way handshake for the target client‑AP pair.
First, capture the handshake. With the BLEShark Nano you can trigger a passive capture, or, where legal, send a deauthentication frame to force a re‑association (EU‑compliant firmware disables this by default). Once you have a .pcap file containing the handshake, open Wireshark’s Preferences → Protocols → IEEE 802.11 and add a decryption key in the format:
wpa-pwd:your-ssid:your-psk
After applying the key, Wireshark will automatically decrypt subsequent data frames, revealing HTTP requests, DNS queries, and even TLS handshakes (though the payload remains encrypted). This visibility is invaluable for troubleshooting network performance or detecting rogue devices.
sequenceDiagram
    participant C as Client
    participant AP as Access Point
    C->>AP: Authentication Request (802.11)
    AP->>C: Authentication Response
    C->>AP: Association Request (SSID, supported rates)
    AP->>C: Association Response (AID, capabilities)
    Note over C,AP: Four‑Way Handshake begins
    C->>AP: EAPOL‑Key (ANonce)
    AP->>C: EAPOL‑Key (SNonce, MIC)
    C->>AP: EAPOL‑Key (MIC, encrypted GTK)
    AP->>C: EAPOL‑Key (MIC)
    Note over C,AP: PTK derived, traffic encrypted
Reading management frame fields
Management frames are the backbone of WiFi operation. They announce network presence, negotiate capabilities, and manage client connections. Wireshark parses each field, allowing you to extract:
- SSID – the network name, found in Beacon and Probe Response frames.
- Supported rates – indicates the data rates the AP can use.
- Channel – the operating frequency, useful for channel‑hop analysis.
- Security information – RSN (Robust Security Network) elements that describe WPA2/WPA3 capabilities.
- Vendor‑specific IEs – often used by IoT devices for proprietary features.
To isolate beacons, apply the filter wlan.fc.type_subtype == 0x08. Expand the IEEE 802.11 tree in the packet details pane to see each Information Element (IE). For example, the RSN IE contains the group cipher suite, pairwise cipher suites, and authentication key management methods. Understanding these fields helps you verify that an AP is truly using WPA2‑PSK and not a weaker configuration.

WPA2 4‑way handshake captured in Wireshark (Wikimedia Commons)
Advanced analysis techniques
Beyond basic capture, Wireshark can assist with deeper investigations:
-
Roaming detection – filter
wlan.fc.type_subtype == 0x0b(reassociation request) to see when a client moves between APs. -
Power‑level mapping – the
radiotap.dbm_antsignalfield shows RSSI; plotting these values over time reveals coverage gaps. - Channel utilization – count beacon frames per channel to identify congested frequencies.
- Hidden SSID discovery – capture probe requests that contain an empty SSID field; the corresponding probe responses often reveal the hidden network name.
For large‑scale deployments, combine the BLEShark Nano with Shiver mesh nodes. Each node runs a lightweight capture daemon that streams raw 802.11 frames over ESP‑NOW to a central collector. The collector aggregates the streams into a single PCAP file, which you open in Wireshark for a holistic view of the entire area.
flowchart TD
    subgraph Mesh[Shiver Mesh Network]
        direction LR
        N1[Node 1] -->|ESP‑NOW| C[Collector]
        N2[Node 2] -->|ESP‑NOW| C
        N3[Node 3] -->|ESP‑NOW| C
        N4[Node 4] -->|ESP‑NOW| C
    end
    C -->|USB| L[Wireshark on Laptop]
    L -->|Filters| D[Decryption Engine]
    D -->|Display| UI[User Interface]
    style Mesh fill:#f9f,stroke:#333,stroke-width:2px
    style C fill:#bbf,stroke:#333,stroke-width:1px
Using Shiver mesh for distributed capture
The Shiver mesh extends the reach of a single BLEShark Nano. Deploying three to five nodes around a multi‑floor office creates overlapping coverage zones. Each node runs a minimal firmware that captures raw frames on its local channel and forwards them via ESP‑NOW to a master node. Because ESP‑NOW operates in the same 2.4 GHz band, the mesh does not interfere with the WiFi traffic it is monitoring.
Key benefits:
- Scalability – up to 16 nodes can be linked, allowing you to monitor large venues without moving a single device.
- Low latency – ESP‑NOW delivers frames in under a millisecond, preserving timing information crucial for replay attacks or precise latency measurements.
- Power efficiency – each node draws only a few milliamps while listening, extending battery life beyond a full day of continuous capture.
When configuring the mesh, ensure all nodes share the same WiFi channel and that the master node’s Wireshark instance is set to capture on the virtual interface created by the mesh daemon. The resulting PCAP contains frames from every node, each tagged with a custom vendor IE that identifies the source node – a handy way to map signal strength to physical location.
Legal and EU compliance notes
Capturing WiFi traffic is legal in many jurisdictions when you own the network or have explicit permission. In the European Union, the GDPR and national e‑privacy laws restrict the collection of personally identifiable information without consent. The BLEShark Nano’s firmware disables active deauthentication by default for EU users, limiting the device to passive listening and handshake capture only. If you need to trigger a re‑association for testing, you must do so on a private network where you have full authority.
Always document your consent, keep captured data encrypted, and delete any personal data that is not required for your analysis. Failure to comply can result in fines or criminal penalties.
Disclaimer: The use of deauthentication or other active interference features may be illegal in your jurisdiction. The BLEShark Nano complies with EU regulations by disabling deauth by default. Users are responsible for ensuring their activities are lawful.
Conclusion
Wireshark, combined with a capable capture device like the BLEShark Nano, gives you full visibility into 802.11 traffic. By enabling monitor mode, applying focused display filters, decrypting WPA2 with a known PSK, and parsing management frames, you can troubleshoot, secure, and optimize any WiFi deployment. Extending the setup with a Shiver mesh adds range and redundancy, turning a single handheld sniffer into a distributed monitoring platform.
Whether you are a network engineer, a security researcher, or a hobbyist building a home lab, the workflow described here provides a repeatable, standards‑compliant method for deep WiFi analysis.
Author: George Maxutov